Introduction to Solaris Zones
Introduction Of Solaris Zones
A zone is a virtualized OS which is created within a single instance of Solaris 10. Each environment has its own identification that is separate from the primary hardware. Each environment works independently as if running on its own system, making consolidation simple, safe, and secure. In this article, we will discuss about the Solaris Zones/container in detail.
whenever we go to the new topic, there are 3 questions will raise, what ? why ? and how? let we can find the answers...
Advantages of ZONES
Reduce costs by running multiple instances
workloads on the same system
Better hardware utilization
Reduced infrastructure overhead
Lesser administration costs (admins/workload)
Resource controls
Security isolation
Software package administration
ZONE FEATURES
| Granularity | Zones can run on any number of available CPUs and amount of available memory. |
| Isolate | Run the Multiple application on same Global Zone. |
| Security | Hacking one zone does not compromise applications running in other zones. |
| Transparency | Applications do not need to be recompiled to run in zones (except for some privileged operations) |
| Virtualization | Hide configuration information from applications |
| Memory Capping | Manage the memory usage of zones |
| Dynamic Resource Pools | Assign CPUs to Zones |
| Fair share scheduler | Grant a zone minimal CPU usage. |
Key Points :-
• Depends on our hardware capability we can create the non-global zones up to 8191.
• Each zone has an ID assigned by system when it's booted with the global zone, always listed as zone ID 0.
• Only the global zone contains a bootable Solaris kernel and is aware of all devices, file systems, zones.
• Depends on our hardware capability we can create the non-global zones up to 8191.
• Each zone has an ID assigned by system when it's booted with the global zone, always listed as zone ID 0.
• Only the global zone contains a bootable Solaris kernel and is aware of all devices, file systems, zones.
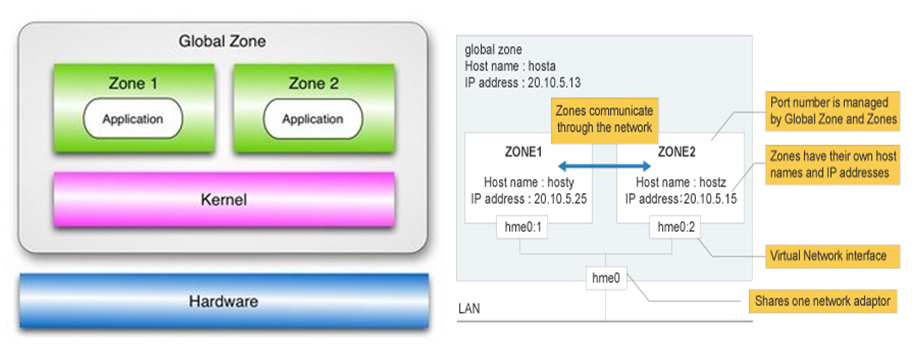
Types Of ZONES : Zones come in two flavors:
Global Zone
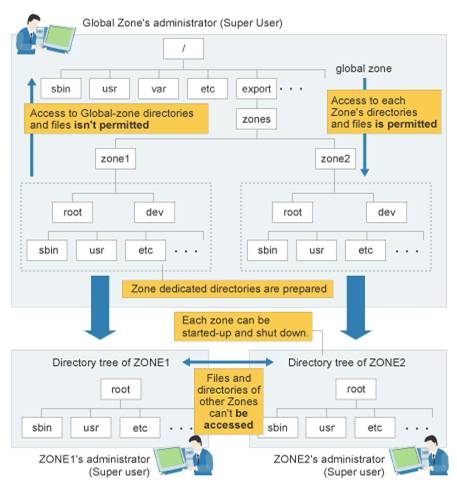
• Global zones controls the hardware resources and are administrating the Non-Global Zones.
Non-Global Zone
• Virtualized Solaris execution environments, but that look and feel just like a normal standalone servers and also its called as Local Zones. There are 3 types Of Local Zones.
Global Zone
• Global zones controls the hardware resources and are administrating the Non-Global Zones.
Non-Global Zone
• Virtualized Solaris execution environments, but that look and feel just like a normal standalone servers and also its called as Local Zones. There are 3 types Of Local Zones.
Types Of Local Zones

Sparse Root Zones
• Share binaries with the global zone and also called as Native Zones.
• /usr, /platform, /sbin, /lib are the FS are shared from global zone as read-only loopback filesystem.
• Very Less disk Space is sufficient for creating this type of Zones.
• Quick and Very less time is required to create this type of Zones.
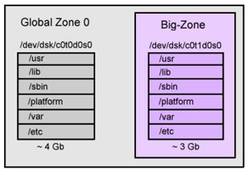
Whole Root Zones
• Contain a complete copy of the Solaris binaries that are installed in the global zone
• Approximately its required 3 GB space for creating this type of zones.
• Contain a complete copy of the Solaris binaries that are installed in the global zone
• Approximately its required 3 GB space for creating this type of zones.
Branded Zone
• Supports different versions of Solaris OS. For example, you can install Solaris 8 or 9 in a branded zone.
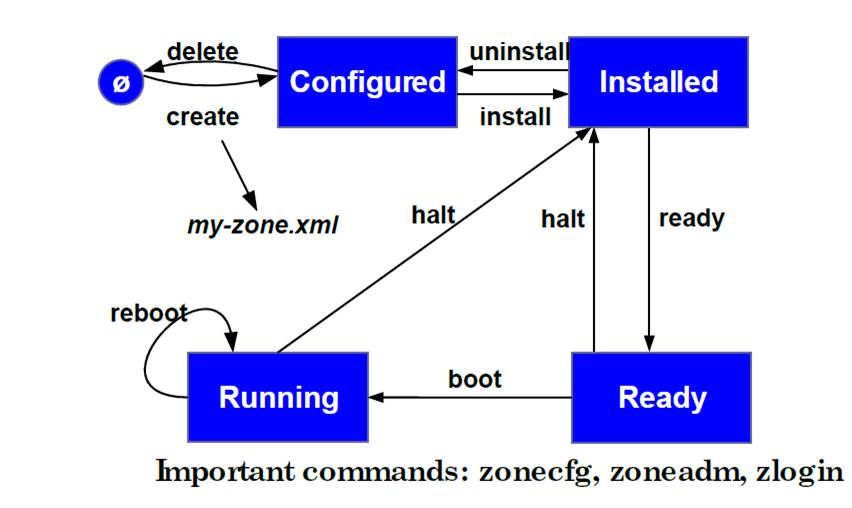
ZONE States
As shown in below image we can understand the flow of zone states clearly.
• Supports different versions of Solaris OS. For example, you can install Solaris 8 or 9 in a branded zone.
ZONE States
As shown in below image we can understand the flow of zone states clearly.
| ZONE States | |
|---|---|
| Configured | Configuration was completed and Committed |
| Incomplete | Transition state during install or uninstall Operations |
| Installed | The packages have been successfully installed |
| Ready | The virtual platform has been established |
| Running | The zone booted successfully and is now running |
| Shutting down | The zone is in the process of shutting down - this is a temporary state, leading to "Down" |
| Down | The zone has completed the shut down process and is down - this is a temporary state, leading to "Installed" |
Zone Daemons There are 2 Daemons associated with Zone.
Zoneadmd
• Zoneadmd daemon starts whenever zones requires to be managed.
• Each zones have single instance of Zoneadmd ( ie zoneadmd -z zonename)
• Its started automatically by SMF and its stop automatically when no longer required.
• Allocates the zone ID and starts the zsched process
• Sets system-wide resource controls
• Plumbs the virtual network interface
• Mounts any loopback or conventional file systems
Zsched
• The zsched process is started by zoneadmd.
• The zsched job is to keep the track of kernel threads running within the zone.
• It is also known as the zone scheduler.
Frequently Using Zone Commands
zonecfg
• Add/Delete/Modify/info zone configuration
# zonecfg -z zone-name: Interactive mode; can be used to remove properties of the following types: fs, device, rctl, net, attr
# zonecfg -z zone-name commit
# zonecfg -z zone-name create
# zonecfg -z zone-name delete
# zonecfg -z zone-name verify
zoneadm
• Change the Zone states or Administration of Zones
# zoneadm -z zone-name boot
# zoneadm -z zone-name halt
# zoneadm -z zone-name install
# zoneadm -z zone-name ready
# zoneadm -z zone-name reboot
# zoneadm -z zone-name uninstall
# zoneadm -z zone-name verify
zlogin
• Login non-global from global zone
# zlogin zone-name
# zlogin -C zone-name ( Login to zone console)
| Zone Components |
| ||
|---|---|---|---|
| zonepath | Path of the zone root which is from global zone's file space. | ||
| Autoboot | Define whether we need automatically boot the zone | ||
| pool | Associate the zone with a resource pool; multiple zones may share a pool. | ||
| net | Network interface of Zone | ||
| fs | File systems from the zone's /etc/vfstab, automounted file systems configured within the zone, manually mounted file systems or ZFS mounts from within the zone | ||
| dataset | To manage non-global zone with ZFS file system. | ||
| inherit-pkg-dir | In a sparse root zone, represents directories containing packaged software that a non-global zone shares with the global zone. (Should not be used in a whole root zone.) | ||
| device | Devices that should be configured in a non-global zone. | ||
| rctl | Zone-wide resource controls such as zone.cpu-shares andzone.max-lwps | ||
| attr | Zone comments |
also please note the below "sub commands", this will also important while configuration the zone.
| SUB COMMANDS | |
|---|---|
| add | Add the specified resource or components |
| cancel | Ends the resource specification and returns to the global scope without retaining partially specified resources. |
| commit | Save the current configuration to the disk. |
| create | Create new zone configurations |
| delete | Destroy configuration. |
| end | Ends the resource specification |
| exit | Ends the zonecfg session. |
| info | Display information about the configuration of the current scope. |
| remove | Remove the specified resource |
| revert | Return to the last state written to disk. |
| set | Set the specified property to the specified value |
| verify | Verify the current configuration for correctness. |
Let we can see how to add the listed zone components with using "zonecfg" command
* Set zonepath and Autoboot (the zones servicesvc:/system/zones:defaultmust also be enabled when we go for autoboot=true)
* In the following example, Filesystem is added into the non-global zone
* In the following example, Network is added into the non-global zone
* In the following example, ZFS Dataset filesystem is added into the non-global zone
* In this example, Specify the Memory Limits. Each limit is optional, but at least one must be set.
* In this example, Assigning Dedicated CPU (1-3). we can set the importance as well.
*In this example, specifies Capped CPU of 3.5 CPUs for the zone1
* Set zonepath and Autoboot (the zones servicesvc:/system/zones:defaultmust also be enabled when we go for autoboot=true)
zonecfg:zone1> set zonepath=/export/home/zone1
zonecfg:zone1> set autoboot=true
zonecfg:zone1> verify
zonecfg:zone1> commit
zonecfg:zone1> exit
* In the following example, Filesystem is added into the non-global zone
bash-3.00# zonecfg -z zone1
zonecfg:zone1> add fs
zonecfg:zone1:fs> set dir=/test/mnt
zonecfg:zone1:fs> set special=/dev/vx/dsk/zonedg/vol1
zonecfg:zone1:fs> set raw=/dev/vx/rdsk/zonedg/vol1
zonecfg:zone1:fs> set type=vxfs
zonecfg:zone1:fs> end
zonecfg:zone1> verify
zonecfg:zone1> commit
zonecfg:zone1> exit
* In the following example, Network is added into the non-global zone
zonecfg:zone1> add net
zonecfg:zone1:net> set physical=e1000g0
zonecfg:zone1:net> set address=192.168.10.35
zonecfg:zone1:net> end
zonecfg:zone1> verify
zonecfg:zone1> commit
zonecfg:zone1> exit
* In the following example, ZFS Dataset filesystem is added into the non-global zone
bash-3.00# zonecfg -z zone1
zonecfg:zone1> add dataset
zonecfg:zone1:dataset> set name=zonepool/zone1vol
zonecfg:zone1:dataset> end
zonecfg:zone1> verify
zonecfg:zone1> commit
zonecfg:zone1> exit
* In this example, Specify the Memory Limits. Each limit is optional, but at least one must be set.
zonecfg:zone1> add capped-memory
zonecfg:zone1:capped-memory> set physical=50m
zonecfg:zone1:capped-memory> set swap=100m
zonecfg:zone1:capped-memory> set locked=30m
zonecfg:zone1:capped-memory> end
zonecfg:zone1> verify
zonecfg:zone1> commit
zonecfg:zone1> exit
* In this example, Assigning Dedicated CPU (1-3). we can set the importance as well.
zonecfg:zone1> add dedicated-cpu
zonecfg:zone1:dedicated-cpu> set ncpus=1-3
zonecfg:zone1:dedicated-cpu> set importance=2
zonecfg:zone1:dedicated-cpu> end
zonecfg:zone1> verify
zonecfg:zone1> commit
zonecfg:zone1> exit
*In this example, specifies Capped CPU of 3.5 CPUs for the zone1
zonecfg:zone1> add capped-cpu
zonecfg:zone1:capped-cpu> set ncpus=3.5
zonecfg:zone1:capped-cpu> end
zonecfg:zone1> verify
zonecfg:zone1> commit
zonecfg:zone1> exit
